If you're like the vast majority of digital camera owners I talk to, you're one of the many that has a camera with features they don't use, or have forgotten how to use.
Nearly all of you (that I speak of) shoot in AUTO mode. You get decent photos most of the time, but sometimes you just know the shots could be better if only you had set this or that on your camera.
I'm not going to talk about all the bells and whitles your camera has here and when to use them. It is better to get to know them one at a time. You will remember what they do that way. What I do want you to do starting today is STOP USING AUTO.
That's right. Say good-bye to the AUTO setting and never use it again. Never you say? NEVER. There is a much better setting on your camera called PROGRAM.
PROGRAM is like AUTO on steroids. PROGRAM still does many of the things AUTO does, it just lets you do MORE! I want you to try putting your camera on PROGRAM and walk around the house taking a few shots. Notice anything? Probably not, unless it is dark indoors. We'll talk about that in one second.
That's the thing. PROGRAM still does auto metering, auto focusing, auto everything pretty much. What is didn't do was turn on the flash automatically. You now have that control. You decide when or when not to use flash, and flash is one of those tools that can make a huge difference to photos, but AUTO mode is not intelligent enough to know when to utilize flash best. You are.
Take outdoor shots for instance. I'll bet you have tons of photos of friends or family in a grouping with the sun shining down on their faces. There's nothing wrong with the shot but that darned sun can cause less than flattering shadows on peoples faces. If instead YOU "knew" that flash would fill in those shadows and create a fantastic shot and YOU decide to turn on the flash yourself. Wow! Perfect shot!
So, now that you have gone PROGRAM mode instead of AUTO, you have more control over a simple decision like the flash. You know best when to use flash, not the camera.
There's another great benefit of using PROGRAM mode and I'll soon write another article about that. In the meantime, give PROGRAM mode a try. You will be amazed by the results. If you aren't, you just haven't got the knack of it yet.
Learn and expand your photography skills, one by one.
Sabtu, 27 Mei 2006
Rabu, 24 Mei 2006
A Quick Review of SmugMug
By Richard McMillan
SmugMug, the online photo sharing service, has several outstanding features that have resulted in a faithful following; indeed it can be counted as among the best photo sharing services in the world.
SmugMug, the online photo sharing service, has several outstanding features that have resulted in a faithful following; indeed it can be counted as among the best photo sharing services in the world.
Users can upload an unlimited number of photos, there are no ads to distract while browsing the site, sharing and uploading is quick and efficient, and the site offers unlimited storage. The site does not offer a free membership upon furnishing credit card details. All the same, the website, www.smugmug.com offers a 7-day free trial that allows users to get a feel of its services.
One can avail the services of SmugMug via three account types – Standard, Power User, and Professional. A Standard account costs $ 39.95 and comes packed with a host of benefits that allow adding and sharing of photos with just a click, a URL for the individual, and photo enhancement tools among other facilities. A Power User account costs $ 59.95 per annum; it offers all the benefits of the standard account plus the facility of replacing the SmugMug header and footer with the customer’s own. A Professional account costs $ 149.95 per annum and allows users to trade in photos and make money.
One can upload photographs in more than one way with SmugMug. Windows users can drag and drop photos, photos can also be uploaded in batches for Windows and Mac users as well as by those who use Netscape and Linux. Video clips of up to 8 MB per clip can be uploaded and played in the gallery. Photos saved on SmugMug can be printed on a home printer; high quality gloss, matte, and luster prints in 26 different sizes can be ordered from SmugMug. Visitors to a user’s home page on SmugMug can browse the photos without having to provide their email address or create their own account.
SmugMug is particular about maintaining decorum as would befit a family site. Uploading and display of content displaying explicit nudity is prohibited. SmugMug has an efficient customer support system that includes a detailed Help page covering several topics, a user forum, and problem resolving via email.
Richard McMillan recommends you check out the SmugMug review.
Senin, 22 Mei 2006
Digital Camera Reviews To Help You Pick The Right Camera
"Planning to buy a new digital camera? Be sure that you are not misguided by the salesman in the electronics store you visit. A number of times people get misguided by the inevitable qualities described by the sales persons. So, you must be aware of certain things while buying the digital cameras. The best source to get informed on the essential features of digital cameras is reading the digital camera reviews.
The digital camera reviews inform you about the pros and cons of each and every make of these digital cameras. You can find the minutest details about each and every part of the digital camera via the reviews. It is advisable to read the reviews because they are unbiased. You will get to know the positive as well as negative points of the particular digital camera, if you go well through these reviews. It is obvious that no company would mark out the flaws in their products."
Wise words from a post over at the Tools and Gadgets.
The writer goes on to say-
"The internet is the best source to find out the most suitable camera according to your needs. You will find detailed reviews by eminent photographers there. These photographers are offered the camera for use to write a review. Also the editors of some most famous technology magazines put up their reviews after undergoing the trial of these cameras."
Minggu, 21 Mei 2006
Portrait Photography Tips
By Kenneth Hoffman
Portraits are not born, they are made. They are created in the mind of the artist from portions of the subject, experiences, lighting and composition. Some general parameters should be set early on.
A somber, serious mood is enhanced by dark background tones, contemplative expressions, loose low-toned clothing, and deep, but open shadows. A happy, carefree atmosphere is set more convincingly with light, airy background tones, piquant expressions, pastel casual clothing and soft, ubiquitous lighting.
Props should be kept to a minimum. Allowable is anything which will support the mood and which will not detract from the main subject. A high key portrait can be enhanced with a white wicker chair, a loose white flower arrangement out of focus in the background or a high-keyed landscape judiciously placed off center, blending with the other background tones. A large, dark sculptured bowl of red apples, a black poodle, or a dark-toned piece of furniture in the background would contrast too sharply with the generally light toned subject and background. Attention diverted to these items due to their strong intrusion in the composition is lost to the main subject and detracts from the ambiance.
Attention should be paid to the lines created by the subject and other components in the composition. Lines leading strongly out of the picture should be avoided. Rather use curves to bring the eye back to the main subject. Moveable items in the composition can be place to complete gap in a leading line so as to facilitate the eye in its movement around the work. Invisible paths of light can be created with the use of similar colors, a repeated pattern or item, or the play of light and shadow along an edge. Where possible choose components with care, preferring meaningful items which play a part in the life of the subject, rather than an object chosen solely for its shape and color. For instance, if the subject is a potter, choose an attractive urn instead of, say, an antique doll which has no place in the subject's interests.
The light that falls on the subject can be used to support the mood. Natural window light suggests an old master genre and the sharp golden rays of a small source of light created the highlights necessary for a mood with a positive spin. Any available light can create a beautiful portrait if the direction and ration of light to dark is controlled. Reflectors add light to a dark, shadowed area, scrims or shades can tone down a too-strong source. The direction or the main source of light should enhance the features by sending light into the eyes, outlining the jaw and cheek, and finding the proper areas to highlight. Additional highlights are supplied with back or side-back rays of light, as long as their effect does not invent unwanted facial highlights or block up needed detail. Pure rim lighting is fairly safe if used with care.
Forward planning a portrait gives the artist an important edge toward making a successful portrait. Proper clothing, location, time of day, weather and needed props go a long way in helping the artist concentrate on the critical tools present in the mind of the artist.
I search every face for strong and weak points.
Things You Should Know Before Buying Discount Cameras
by Nicky Pilkington
Taking photographs has always been considered an enjoyable pastime. Photography is one of the best ways to capture a moment in time. It seems now the world has become obsessed with taking pictures. Everywhere you look there are advertisements for cameras. Probably one of the most significant innovations in the Digital Age has been the digital camera. At one time these cameras had one thing in common with their non-digital counterparts--an expensive price tag. In recent years the cost of digital cameras has dropped considerably; so much so that you can easily purchase a digital camera for less than $200. To find the best deal you will need to do some comparison-shopping. By arming yourself with some information about digital cameras, you will better prepare yourself for buying discount cameras.
As most of the innovations in digital technology, digital cameras are considered more complex than they really are. When you shop for discount cameras, price should not be your only guide. It is a good idea to understand some of the basic features of digital cameras so that you can effectively compare the various models available on the market.
If you're interested in buying discount cameras, you undoubtedly are familiar with at least one buzzword associated with digital cameras: megapixel. Megapixel, which refers to the number of pixels per one million or how fine an image's resolution is, is important to consider when buying discount cameras because megapixel directly relates to the image quality you are able to obtain. When you shop for discount cameras you will notice that there are a wide range of megapixels. At one time, a digital camera with 1.3 megapixel was standard and a camera with 5.0 megapixels was considered top-shelf. With the recent introduction of digital cameras with 9.0 megapixels, the standard in megapixels is changing.
Buying a digital camera with the highest number of megapixels is not necessarily the best method of selecting a digital camera. Since megapixels relate to an image's resolution, you should first determine your plans for the digital camera. If you want simply to take images for personal use, a median number of megapixels such as 3.5 may be sufficient. If on the other hand you intend to enlarge and crop images, you may want to shop for digital cameras with a higher number of megapixels.
The number of megapixels that a camera uses is the primary selling point for digital cameras. However, it is the additional features that will have the greatest effect on price. Optional features that you may want to consider include video recording capabilities, an optical zoom lens, and a histogram. Most cameras include a zoom lens, but it is usually a digital zoom lens. This type of lens only appears to enlarge the image. An optical zoom lens is an ideal option if you will use your digital camera to shoot distant objects. Creating a digital movie is another popular option. If you want a digital camera with this feature, be sure to note the maximum recording time. A handy feature that is not used often, but is very handy if you are serious about digital photography is histogram. Once you snap an image you can use the histogram option to analyze the exposure. If an image is too bright or too dark you can reshoot the image.
You should be aware of the five distinct types of digital cameras available:
* Compacts. Simple to use and inexpensive (around $150 to $300), these are best for everyday shooting situations. As a consequence of their simplicity, however, they may have limited manual controls for exposure and composition. Models from our tests whose combination of low price and high performance qualify them as CR Best Buys are the top-rated Canon PowerShot A510 (3 megapixels; $180), the Kodak EasyShare CX7430 (4 megapixels; $180), and the Olympus D-580 Zoom (4 megapixels; $160). The Canon has manual controls and a 4x zoom lens. The Kodak and Olympus have 3x zooms and longer battery life.
* Subcompacts. Their small size and light weight let you carry these anywhere, although that smallness may make them awkward to operate. Expect to pay from $200 to $350. We like the Canon PowerShot SD300 (4 megapixels; $310), the Sony Cyber-shot DSC-L1 (4 megapixels; $240), and the Nikon Coolpix 7900 (7 megapixels; $350). All have a 3x zoom and all lack manual controls.
* Advanced compacts. These have versatile controls, long zoom ranges, and can store a shot as a "RAW" image -- preserving the original data the sensor captured, eliminating any undesirable effects of the camera's built-in processing. Cost: $300 to $600. The Fujifilm FinePix E550 (6 megapixels; $300) and the bulky Olympus C-7070 Wide Zoom (7 pixels; $390) have 4x zoom lenses. The Canon Powershot S60 (5 megapixels; $360) has a 3.6x lens.
* Super zooms. Larger, bulkier, heavier, and -- at $250 to $450 -- costlier than most compact models, these have a very long zoom range with powerful telephoto settings. They're a good choice for travel, nature and sports photography. Our choices are the Panasonic Lumix DMC-FZ5 (5 megapixels; $420), the Olympus C-765 Ultra Zoom (4 megapixels; $270), and the Canon PowerShot S1IS (3 megapixels; $270). The Olympus and Canon have 10x zooms; the Panasonic, 12x.
* SLRs. Serious photographers who want more control over their images than most point-and-shoots provide have that option in single-lens-reflex (SLR) digital cameras. These accept interchangeable lenses, and lack or minimize some of the shortcomings of point-and-shoots. (For example: Shutter lag, the delay between the time you trip the shutter and when the camera takes the picture, is almost nonexistent in SLRs. In other digital cameras, the lag is about 1 second.) Expect to pay $900 to $1,500 for these big, heavy models. We like the Canon EOS Digital Rebel XT (8 megapixels; $1,000) for its near-professional power and controls. It comes with an 18mm-55mm zoom lens, and at 27 ounces is the lightest of the SLRs we tested.
Black and White Photographs
I love old black and white movies. Films like Casablanca or Citizen Kane just wouldn't be the same had they been made in colour. These films were black and white because that was the level of technology of those times. But when you stand back and look at these films you can see that because the colour is stripped away they have in a sense become timeless and when viewed there is always something a bit special and different about them.
The same is true of a black and white photograph. A black and white photograph of an old wrinkly woman sitting by her doorstep is timeless, powerful and extremely though provoking. A picture of an old building or a city view in black and white has the same affect. Without colour you tend to look more closely at the subject and see a level of detail and arguably emotion that you may never spot with full colour. As mentioned before depending on the subject a black and white piece of art is essentially timeless.
Nostalgia is time and again the word expressed when these images are viewed. This is why so many people opt for black and white photographs within the home.
Sabtu, 20 Mei 2006
Set yourself an artistic assignment by photographing nature
By Kenneth Hoffman
Repetition is a warm, comfortable feeling that catches the eye and when interrupted, serves as a foil to bring attention to your main subject. When you are out looking for good pictures to take, let you eye roam the field, and to search out patterns that can be used to highlight your main subject of interest. On your left two children climb on the monkey bars, on your right is a wall covered with climbing ivy. A judicious move to the other side of the monkey bars brings the ivy behind the action and a telephoto lens fills your view finder with happy faces against a waterfall of green leaves. Get the picture?
City environments supply the photographer with many choice patterns. A board construction wall, shadow stripes on the sidewalk, ripples in a puddle, or evenly spaced clouds marching across the sky are possible backgrounds for a myriad of subjects. All it takes is a receptive mind, a stick-to-it attitude, and careful cropping in the camera.
Patterns themselves, when juxtaposed interestingly, make good compositions, vying for a place in the modern art world. Some repetitions are recognized only with a macro lens. In nature, petals, leaves, bark and corrugated sand shapes show beautiful designs when viewed at a distance of a few inches. Interrupting features could be insect, a cocoon, an odd pebble or a reflection in a drop of water. If an interesting pattern pops up on your travels, don’t be afraid to record it for a future combination with other images. The digital age is here and you can be part of it. Happy shooting!
I am now preparing for my third art exhibit.
Jumat, 19 Mei 2006
Free Photo Editing Software
There are many image editing tools on the Internet. Many also let you print digital photos. These programs offer varying degrees of image editing features. Here is a list of my top 5 picks for image editing downloads.
irfanView
IrfanView is a very fast, very small program for those quick tweaks like resizing for the web, sharpening. I use this program everyday for graphics I intent to put on the web. It can't be beat for being quick and light weight.
http://www.irfanview.com/
GIMP
The GIMP (GNU Image Manipulation Program) is an open-source program originally developed by two university students in 1996. It has now morphed into a powerful image editor with a huge user base. The latest version, the GIMP 2.0, has a revamped user interface hoping to gain a wider audience.
http://www.gimp.org/
Picasa
Picasa is a powerful and free software from the folks at Google that helps you instantly find, edit and share all the pictures on your PC. If you always had problems keeping track of your pictures, Picasa will help you do that by sorting them into visual albums. Moreover, if you want to quickly touch up your photos, Picasa offers many one-click fixes to do just that. What’s more, the program allows you to easily share those photos through email, printing or CDs. There are a couple of things about its interface I'm not crazy about but I keep it on my system for certain tasks like bulk emailing photos.
http://picasa.google.com/index.html
Faststone
Not well known is a freebie called Faststone. A lot of bang for the buck here with photo management, a really slick interface and rudimentary photo editing capabilities. A great Picasa alternative.
http://www.faststone.org/
cam2pc
I love cam2pc. It runs in my system tray automatically (but doesn't gobble up resources). When I plug any one of my cameras into my USB port, magic happens. cam2pc names the folder to copy your files to and even renames your pictures exactly the way you want it. It also rotates automatically the pictures you have taken in portrait mode (on compatible cameras).
http://www.nabocorp.com/cam2pc/
Grab one or all of this photo editing freeware today!
Digital Asset Management for Photographers
O’Reilly Press Release
Organizational Gold Mine for Photographers O’Reilly Introduces “The DAM Book: Digital Asset Management for Photographers”
Sebastopol, CA--Every time you shoot, scan, or store a photograph, you are involved with DAM or digital asset management, which includes every part of the process that follows the taking of the picture through final output and permanent storage. However, most photographers, whether amateurs capturing a vacation, or professionals earning a living, don’t really know the best way to systematically and efficiently manage workflow for their photography.
A professional photographer for twenty years, author Peter Krogh explains the whole DAM system in “ The DAM Book: Digital Asset Management for Photographers” (O’Reilly, US $34.95). He cuts the often overwhelming task of managing digital photos down to manageable size with a solid plan, practical advice, and a workable system for filing, finding, protecting, and re-using photographs.


Having contributed to the development and testing of Adobe Photoshop CS2, Adobe Bridge, and the DNG Raw format, Krogh is uniquely suited to guide you through their use. He designed the book “for anyone who is serious about his or her photographs,” promising that “once you understand the concepts that are described here, working with your digital photographs will be simpler, more straightforward, and more secure than you can probably imagine now.” Adobe Systems Senior Creative Director Russell Preston Brown agrees, saying, “When I want to look good in front of a demanding crowd of photographers, I never hesitate to steal from this book. Peter Krogh definitely knows what he’s talking about.”
“The DAM Book,” produced in full color, will show you how to:
-Transition to new, more efficient ways of archiving images -Understand the best methods for filing and storing information, so you can easily and quickly find what you need -Apply metadata and choose useful keywords -Set up a system that will evolve and grow with your needs and technological innovations -Configure the hardware needed for a stable digital archive -Protect yourself against the accidental loss of your images and enable full recovery should a drive failure occur -Leverage AdobePhotoshop CS2 with Adobe Bridge navigational software to improve your workflow -Integrate Bridge, Camera Raw, and Digital Asset Management software -Use cataloguing software to organize your images -Keep track of multiple versions of your images and find the best one quickly -Migrate your existing archive into your new DAM system -Import your film images into your digital archive
Part of O’Reilly’s Digital Studio series, “The DAM Book” will cut down on the time you spend searching your hard drive and file cabinet for a particular image. With the DAM system, you’ll be able to assign and track the data content on your photos. And, if you’re a professional, the DAM system will assure that your images bear your copyright and contact information, so there will be no more photos circulating in the marketplace unprotected. Professional or dedicated amateurs alike, will wonder how they survived without it.
O’Reilly’s Digital Media Resources
The world of digital media continues to expand with possibilities. Digital technology is becoming more accessible and is sparking creativity in a broader audience. Digital media artists--from the hobbyist or pro photographer to the graphics designer and digital video producer, or the DJ to the songwriter and composer--can find a wealth of informative and instructional articles, books, guides, and media content at O’Reilly’s Digital Media site. For more creative inspiration, visit:
http://digitalmedia.oreilly.com/.
Organizational Gold Mine for Photographers O’Reilly Introduces “The DAM Book: Digital Asset Management for Photographers”
Sebastopol, CA--Every time you shoot, scan, or store a photograph, you are involved with DAM or digital asset management, which includes every part of the process that follows the taking of the picture through final output and permanent storage. However, most photographers, whether amateurs capturing a vacation, or professionals earning a living, don’t really know the best way to systematically and efficiently manage workflow for their photography.
A professional photographer for twenty years, author Peter Krogh explains the whole DAM system in “ The DAM Book: Digital Asset Management for Photographers” (O’Reilly, US $34.95). He cuts the often overwhelming task of managing digital photos down to manageable size with a solid plan, practical advice, and a workable system for filing, finding, protecting, and re-using photographs.
Having contributed to the development and testing of Adobe Photoshop CS2, Adobe Bridge, and the DNG Raw format, Krogh is uniquely suited to guide you through their use. He designed the book “for anyone who is serious about his or her photographs,” promising that “once you understand the concepts that are described here, working with your digital photographs will be simpler, more straightforward, and more secure than you can probably imagine now.” Adobe Systems Senior Creative Director Russell Preston Brown agrees, saying, “When I want to look good in front of a demanding crowd of photographers, I never hesitate to steal from this book. Peter Krogh definitely knows what he’s talking about.”
“The DAM Book,” produced in full color, will show you how to:
-Transition to new, more efficient ways of archiving images -Understand the best methods for filing and storing information, so you can easily and quickly find what you need -Apply metadata and choose useful keywords -Set up a system that will evolve and grow with your needs and technological innovations -Configure the hardware needed for a stable digital archive -Protect yourself against the accidental loss of your images and enable full recovery should a drive failure occur -Leverage AdobePhotoshop CS2 with Adobe Bridge navigational software to improve your workflow -Integrate Bridge, Camera Raw, and Digital Asset Management software -Use cataloguing software to organize your images -Keep track of multiple versions of your images and find the best one quickly -Migrate your existing archive into your new DAM system -Import your film images into your digital archive
Part of O’Reilly’s Digital Studio series, “The DAM Book” will cut down on the time you spend searching your hard drive and file cabinet for a particular image. With the DAM system, you’ll be able to assign and track the data content on your photos. And, if you’re a professional, the DAM system will assure that your images bear your copyright and contact information, so there will be no more photos circulating in the marketplace unprotected. Professional or dedicated amateurs alike, will wonder how they survived without it.
O’Reilly’s Digital Media Resources
The world of digital media continues to expand with possibilities. Digital technology is becoming more accessible and is sparking creativity in a broader audience. Digital media artists--from the hobbyist or pro photographer to the graphics designer and digital video producer, or the DJ to the songwriter and composer--can find a wealth of informative and instructional articles, books, guides, and media content at O’Reilly’s Digital Media site. For more creative inspiration, visit:
http://digitalmedia.oreilly.com/.
Rabu, 17 Mei 2006
Tips for buying a Digital Camera
Even if you’re just a casual shutterbug, there are options to consider
The Associated Press
QUESTION: What should I consider when buying my first digital camera?
ANSWER: If you’re a serious or professional photographer, your needs are obviously greater. But for a casual shooter, many digital cameras will give you what you need for a few hundred dollars. Some of the things to consider:
1. MEGAPIXEL CAPABILITY, or a photo’s resolution. The higher the better for printing photos — but in reality, nearly any digital camera can shoot at enough megapixels for decent prints.
Most new cameras can support at least three megapixels, good for 4 by 6 or even 5 by 7 prints, said Brett Larson, an expert at About.com. However, if you anticipate making larger prints, then consider megapixels. Go for at least four megapixels for 8 by 10 prints, more for larger.
More megapixels also give you more options for cropping. Remember that more megapixels require more storage space.
2. BATTERY NEEDS. It’s great if your camera uses standard types like AA — rechargeable to save money but ones that could be bought in an emergency. Many cameras use proprietary batteries, so expect to invest $25 or $50 for a spare.
3. ZOOM. Ignore “digital zoom,” which means a computer and not the lens is doing the magnification, and make sure the ad for your camera refers to “optical zoom.” Larson says most consumer-grade cameras will come with 2x or 3x zoom, plenty for basic needs. Going to 10x could cost you a few hundred dollars but is overkill unless you’re shooting lots of events from afar.
4. READINESS. Consider how long it takes for the camera to refresh itself for the next picture. Some cameras have a burst, or continuous shooting, mode that will store images in a buffer rather than wait until they are processed to a memory card. The built-in flash also will range in quality and speed — slower ones might mean greater delays.
5. FORMAT. Most cameras now store photos in JPEG format, but higher-end ones also support RAW — important if you want to do a lot of editing. Most consumers won’t need to bother.
6. BACKUP. When you buy, remember to make backup copies of photos — by burning them to a CD or storing them with a sharing service that lets you access the original, high-resolution image. Otherwise, all your precious memories will go when — not if — your hard drive crashes.
New Take Control ebook offers essential advice for digital camera buyers
New Take Control ebook offers essential advice for digital camera buyers
Digital camera buyers who need help understanding camera reviews or putting all the info together to make a purchase can now find up-to-date advice in the the second edition of "Take Control of Buying a Digital Camera." Written by professional photographer and instructor Larry Chen, the $10 ebook provides a soup-to-nuts guide to the process of purchasing a camera and gives tips for how to get the most out of the camera once it's purchased. The ebook's release kicks off a holiday gift-buying sale at Take Control Books - shoppers can save 50% on all consumer electronics titles through December 26th.
"Take Control of Buying a Digital Camera" assists readers at every step along the way, providing help with budgeting and understanding what types of photos they want to take, friendly advice about the many possible camera features, expert guidance on reading camera reviews and evaluating picture quality, and suggestions on where to shop. The ebook comes packed with photography tips, case studies, and color photos illustrating the discussions, plus a thoughtful section about buying a digital SLR camera. Readers will find a 2-page printable shopping worksheet, which they can print out, annotate as they read, and take with them when they shop. The ebook also includes an appendix summarizing popular cameras in different categories and a glossary covering common photography terms.
"There's almost too much information about digital cameras available on the Internet," commented Take Control publisher Adam Engst," and this ebook helps shoppers make sense of it all and buy the right camera for their needs."
Book Details:
"Take Control of Buying a Digital Camera" by Laurence Chen http://www.takecontrolbooks.com/buying-digicam.html
PDF format, 107 pages, free 32-page sample available Publication date: December 4, 2005
Price: Normally $10, on sale for $5 through December 26th
ISBN: 1-933671-07-6
About TidBITS and the Take Control Series:
TidBITS Electronic Publishing has been publishing highly regarded news and editorial since 1990 when Adam and Tonya Engst created their online newsletter, TidBITS, about Macintosh- and Internet-related topics. The Take Control series has been aiding readers with high-quality, timely, real-world, cost-effective documentation since 2003. To learn more, visit our FAQ at http://www.takecontrolbooks.com/faq.html
###
A Short Course in Nikon D50
Dennis Curtin has produced a Photography Guide Book for people who want to get better pictures with their Nikon D50 digital SLR camera. A Short Course in Nikon D50 Photography is beautifully illustrated guide, has 55 interactive animations that illustrate and explain the core concepts of digital photography. Integrated throughout the eBook, these animations help you understand your camera better, and they are also a lot of fun. An introduction to the new affordable Nikon digital SLR.

Using Your Camera as a Digital Archiving Tool
Digital Video Blog has a good post about an often overlooked use for your digital camera; as an archival tool. Jay Corrao has some good ideas and methods, and has me thinking of lots of things I could and should be taking photos of. Here's a teaser-
Read the full story...
Wouldn't it be nice to have a collection of your most important personal documents; wills, living wills, insurance information, investment information all in one safe and secure place? If you take well lit, focused snapshots of documents with your camera at high resolution you can then import the images to your PC or Mac and burn them onto CD or DVD media; that way your documents can be stored in one place and easily accessible. If you don�t own a digital camera or a computer for that matter don�t worry, you can simply ask for your images to be put on a CD when you get your pictures developed. Once your pictures are on CD they can be saved and output later if needed. Photos that have been digitized in this manner remain intact and unchanged. They do not fade, yellow, or degrade with age. And since CD media is said to have a shelf life of 50 years or more when stored correctly you are basically future proofing your images as well.
Read the full story...
Selasa, 16 Mei 2006
Digital Camera Repairs
It would be ideal if you never had to get your digital camera repaired but the chances are that you will have to during the life of your camera. Most cameras today have a lengthy digital camera repair warranty. Even if your camera is still within the warranty period for digital camera repair then you still have to ensure that you meet the requirements of the warranty.
No digital camera repair warranty covers damage caused by abusing the camera or incorrect use. You also need to check what paperwork you have to send off with your digital camera repair for it to be carried out under warranty, such as the sales receipt and completed warranty card. Your warranty will provide instructions for how to obtain a digital camera repair and the procedures to follow. It is important to use a digital camera repair service authorised by the particular manufacturer of your digital camera to ensure that you do not incur any extra costs. A digital camera repair carried out under warranty will not cost you anything unless the equipment needs to be returned to the factory, in which case there are shipping charges.
One of the most frequent problems that require a camera to be sent to a digital camera repair service is a zoom lens that will not zoom, because the lens is out of alignment. This may have been caused by rough handling or some type of impact which will not be covered by the warranty. If your camera is not able to focus then it will not fire and may print out ‘system error’ or not turn on properly. It is a relatively simple process for a digital camera repair service to realign the zoom lens or reset the zoom barrel guide pins that may have been pushed out of their slots, and this will then enable the lens to focus and zoom. The cost for this form of digital camera repair will vary from service to service but it should be a relatively quick job, as long as the digital camera repair company has the correct equipment onsite. It is worth checking before you decide which digital camera repair service to use that they have the necessary equipment and expertise to carry out the repair and not have to send it away.
The best digital camera repair services have skilled digital camera repair technicians that specialize in repairing certain types and brands of cameras, hundreds of specialized tools to properly service your camera and some may also have custom test jigs to help complete repairs more effectively and efficiently.
Build your own Macro Ring-light
Here's a great tip for you photographers on a budget!
This is tutorial covers building a macro ring-light and is intended for people who own a consumer type of digital camera with macro capabilities. You don't even have to take your camera apart to accomplish this. bonus!
Check out this amazing cost saving how-to build your own Macro Ring-light.

This is tutorial covers building a macro ring-light and is intended for people who own a consumer type of digital camera with macro capabilities. You don't even have to take your camera apart to accomplish this. bonus!
Check out this amazing cost saving how-to build your own Macro Ring-light.
A ring-light can be useful when photographing from really close by (macro). When holding your camera close to the subject you are likely to block the light coming from another light source. Using the flash won't do much good either. It's positioned above the lens, the lens barrel will probably block it, otherwise it would overexpose the scene because it will be too bright.
There are some macro flashes around, but they're very expensive and intended for SLR camera's not the consumer typed digital camera. Because the light comes from different angles the light is equally divided and the scene is perfectly lit.
Mastering Digital Printing | A Must-Have
The Online Photographer today reminds us that the second edition of Harald Johnson's superb Mastering Digital Printing has been out for a while now.
I don't own this book yet, but after reading this from Mike Johnston I think I'll just go ahead and order it right now.
"The book shelves are buckling with books on Photoshop and digital photography, you name it and you can find at least half a dozen books covering the topic. I concluded they all have the same content, the words are just printed in a different order. So something has to be very special to grab my attention, and extra special for me to get my credit card out."
I don't own this book yet, but after reading this from Mike Johnston I think I'll just go ahead and order it right now.


Learn how to easily Airbrush your Photos
Ever wonder how they airbrush celebrity photographs, in order to make the star look picture perfect?
Tutorialplace.com has a quick tutorial up titled Photoshop Photo Retouch: Photo Touchup
http://www.tutorialplace.com/view/Photo-Touchup/3700/index.html
Good photos can be the difference between life and death, at least for your design. Learn how to make the most of them.

Tutorialplace.com has a quick tutorial up titled Photoshop Photo Retouch: Photo Touchup
http://www.tutorialplace.com/view/Photo-Touchup/3700/index.html
Good photos can be the difference between life and death, at least for your design. Learn how to make the most of them.
Every photo has issues of its own, details that, if changed, could result in a whole new quality photo. In this guide I'll show you the process that the image on the right went through. Keep in mind that this guide is nothing but an example of techniques that you may take advantage of when processing your own photos. With a little luck you'll be able to learn from it.
Photographing Fish: 5 Tips For Frustrated Beginners
Photographing pets can often be a difficult proposition. Add water, glass reflections and the low lighting of an aquarium environment, and you've got the recipe for one extremely difficult photo shoot.
But it doesn't have to be that hard. Armed with the following tips, you can get great photos of fish in just about any situation.
1: Get a tripod.
Tripods are usually used for non-moving subjects. But they can be immensely helpful when photographing fish, even ones that are constantly moving. Low light levels lead to slow shutter speeds. So anything you can do to stabilize the camera will be of tremendous help. The best way to photograph moving fish with your camera on a tripod is to loosen the levers on the tripod so you can move the camera freely left, right, up and down but the camera will remain in position if left alone.
2: Get your fish acquainted with the camera.
Now that you have a tripod (since you faithfully followed the first tip), set it up in front of your aquarium with the camera mounted on the tripod. Now leave it. For as long as possible... several days would be ideal. The purpose of this exercise is to get the fish used to seeing the "thing" you're constantly moving around, pointing it at them and making noises. When they're comfortable with the sight of the camera, they'll be more relaxed and less prone to dart around the tank or hide.
 3: Use a digital camera.
Digital cameras allow us to "just take the picture" without worrying about whether we're wasting the film and processing money on a shot that won't be good. When you can focus on getting the best shot possible, no matter how many tries it takes, you're on the right track to get the shot you want.
4: Turn off the lights in the room.
Ambient light causes reflections on the tank glass that may ruin a perfectly good fish photograph. Eliminate all sources of ambient light that you can, and be very aware of any reflections as you shoot. If there are some reflections you can't get rid of, try putting your body between the light source and the glass to shield the tank from the light.
5: Clean the glass, cut the pumps.
Turning off the aquarium pumps before you shoot is an excellent way to clean up your shots of particles and bubbles in the water column. and if you happen to have a planted freshwater tank or reef aquarium, this will also prevent the plants or corals from swaying in your picture, turning into a blurry mess.
Cleaning the glass is probably the most overlooked step to aquarium photography, and quite possible is responsible for more ruined photos than any other issue. Remember, just because you don't see it now, doesn't mean you won't see it in the picture. Amazing how that happens. So clean the glass well, every time, before you pick up the camera.
6: A Bonus!
Have fun. Aquarium photography can become an interesting and challenging hobby all its own. Have fun with it, experiment freely, and be sure to share your pictures online!
About the Author
Travis Staut has worked as a photographer for an online live coral retailer and has had several of his photographs published on the cover of Freshwater and Marine Aquarium Magazine. You can see his work and more articles at his aquarium photography site.
But it doesn't have to be that hard. Armed with the following tips, you can get great photos of fish in just about any situation.
1: Get a tripod.
Tripods are usually used for non-moving subjects. But they can be immensely helpful when photographing fish, even ones that are constantly moving. Low light levels lead to slow shutter speeds. So anything you can do to stabilize the camera will be of tremendous help. The best way to photograph moving fish with your camera on a tripod is to loosen the levers on the tripod so you can move the camera freely left, right, up and down but the camera will remain in position if left alone.
2: Get your fish acquainted with the camera.
Now that you have a tripod (since you faithfully followed the first tip), set it up in front of your aquarium with the camera mounted on the tripod. Now leave it. For as long as possible... several days would be ideal. The purpose of this exercise is to get the fish used to seeing the "thing" you're constantly moving around, pointing it at them and making noises. When they're comfortable with the sight of the camera, they'll be more relaxed and less prone to dart around the tank or hide.
Digital cameras allow us to "just take the picture" without worrying about whether we're wasting the film and processing money on a shot that won't be good. When you can focus on getting the best shot possible, no matter how many tries it takes, you're on the right track to get the shot you want.
4: Turn off the lights in the room.
Ambient light causes reflections on the tank glass that may ruin a perfectly good fish photograph. Eliminate all sources of ambient light that you can, and be very aware of any reflections as you shoot. If there are some reflections you can't get rid of, try putting your body between the light source and the glass to shield the tank from the light.
5: Clean the glass, cut the pumps.
Turning off the aquarium pumps before you shoot is an excellent way to clean up your shots of particles and bubbles in the water column. and if you happen to have a planted freshwater tank or reef aquarium, this will also prevent the plants or corals from swaying in your picture, turning into a blurry mess.
Cleaning the glass is probably the most overlooked step to aquarium photography, and quite possible is responsible for more ruined photos than any other issue. Remember, just because you don't see it now, doesn't mean you won't see it in the picture. Amazing how that happens. So clean the glass well, every time, before you pick up the camera.
6: A Bonus!
Have fun. Aquarium photography can become an interesting and challenging hobby all its own. Have fun with it, experiment freely, and be sure to share your pictures online!
About the Author
Travis Staut has worked as a photographer for an online live coral retailer and has had several of his photographs published on the cover of Freshwater and Marine Aquarium Magazine. You can see his work and more articles at his aquarium photography site.
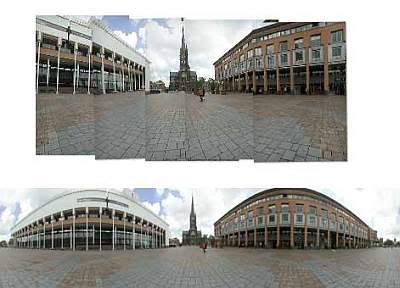
Wide-angle lenses versus Stitched Panorama
From time to time the question comes up as to which is better, using wide-angle lenses or using software programs to create stitched panoramas?
Certainly one use an auto program such as Panorama Factory which can at times provide very good results, but it is not perfect and sometimes the results you will find are unacceptable. But for general use and quick fixes its okay. Be sure to use newer software versions as they are far better than the older, less sophisticated versions.
Using tools such as Panorama Maker, one can produce simply outstanding images without having to deal with the barrel distortion issues you find in most of the wide-angle prosumer cams.
Another thing to consider is that for really wide panoramic scenery photos which will be printed on a long strip of paper. A single wide angled image just would not have enough resolution, especially compared to 6 or 8 photos joined side by side.
Now, if you just need to capture a building from up close, a wide angle lens would be the best way to go. Stitching photos like this - unless you have VERY expensive stitching software - is a nightmare and I would not recommend it.
So, it seems to depend what you like to capture. If you want to shoot building interiors, or close up people reportages, a wide angle lens is a good choice.
If you like to make panoramic landscape shots, stitched panoramas are the way to go.
With a wide angle lens, it is important for a good composition to have something interesting in the picture foreground, otherwise the result is mostly a dull picture, with a lot of empty foreground.
On the other side, with todays digital cameras, it is easy to create a wide landscape shot with a stitched panorama. When using a focal length on the tele side, the result is a more compressed and detailled view of the landscape.
One drawback with stiching is movement. Another is fast changing lighting, as what you see when when clouds are fast moving.

New Digital Photography Book for Advanced Beginners and Amateur Photographers
PRESS RELEASE: New Digital Photography Book for Advanced Beginners and Amateur Photographers
All Things Photography release a new book aimed at amateur photographers with particular emphasis on Digital Photography and the popular Digital SLR.
London, UK (PRWEB) March 12, 2006 -- Whilst many "how to" and "learn this" photography books fill their pages with technical jargon, complicated diagrams and images taken from a stock library, this book is quite different.
100% of the example images in the book are taken by the author, a qualified professional photographer with 20+ year's experience, meaning that when he says how the shot was taken, you can rest assured that he is right.
This book takes you by the hand and explains in great detail exactly how to get the best shots at the point of exposure, actually while you are at the scene. It is the same as having a personal tutor by your side without the added expense.
"With the advance of digital camera technology and photo-editing software, it is understandable that many new photographers become overwhelmed with the technical side of photography and forget to study the basic principles and rules of picture taking. If you can capture an image exactly how you want it at the point of exposure, you save yourself so much time later on and you still have a great "original file" with which you can manipulate to your hearts content"!
The book covers all the important aspects of digital photography including;
Metering, exposure, exposure lock, bracketing, composition, shutter speeds and apertures, ISO, white balance, RAW/JPEG, focussing, lenses, subjects and lighting.
It is written in an easy to understand dialogue as though you were attending a personal tutorial or seminar, here are some recent testimonials:
"Love it...The exposure compensation page was highly informative for me and the examples are brilliant..."
"...Well, I wasn’t going to admit what I am about to tell you but I feel I really should because this is precisely how your writing turns a light on for me, I had a Light Bulb moment, as it were..."
"The kind of things you share (like your own personal thoughts and ways of thinking) are the kind of things that are always left out of other photo books but are essential to doing the job right. Thank you for being so generous. "
The book is backed up by a 300+ page website and even explains how to get started on the road to becoming a full time professional photographer.
For more information, visit:
http://www.all-things-photography.com/advanced-photography-books-for-beginners-and-amateur-photographers.html
Nick has a career and passion for photography spanning two and a half decades. He was recently voted "International Commercial Photographer of the Year 2005" by the S.W.P.P and B.P.P.A (Society of Wedding and Portrait Photographers and British Professional Photographers Association).
###
Also don't miss this one-
Stock Photography: Going Digital
How you can sell your digital stock images online today.
All Things Photography release a new book aimed at amateur photographers with particular emphasis on Digital Photography and the popular Digital SLR.
London, UK (PRWEB) March 12, 2006 -- Whilst many "how to" and "learn this" photography books fill their pages with technical jargon, complicated diagrams and images taken from a stock library, this book is quite different.
100% of the example images in the book are taken by the author, a qualified professional photographer with 20+ year's experience, meaning that when he says how the shot was taken, you can rest assured that he is right.
"When you purchase a new DSLR these days, you are given a very comprehensive manual that not many people read, a bundle of software, a few cables and then you are just left to get on with it. It can be very frustrating when you realise that even on "Fully Automatic" mode, you still need the basic skills in order to capture beautiful images."
This book takes you by the hand and explains in great detail exactly how to get the best shots at the point of exposure, actually while you are at the scene. It is the same as having a personal tutor by your side without the added expense.
"With the advance of digital camera technology and photo-editing software, it is understandable that many new photographers become overwhelmed with the technical side of photography and forget to study the basic principles and rules of picture taking. If you can capture an image exactly how you want it at the point of exposure, you save yourself so much time later on and you still have a great "original file" with which you can manipulate to your hearts content"!
The book covers all the important aspects of digital photography including;
Metering, exposure, exposure lock, bracketing, composition, shutter speeds and apertures, ISO, white balance, RAW/JPEG, focussing, lenses, subjects and lighting.
It is written in an easy to understand dialogue as though you were attending a personal tutorial or seminar, here are some recent testimonials:
"Love it...The exposure compensation page was highly informative for me and the examples are brilliant..."
"...Well, I wasn’t going to admit what I am about to tell you but I feel I really should because this is precisely how your writing turns a light on for me, I had a Light Bulb moment, as it were..."
"The kind of things you share (like your own personal thoughts and ways of thinking) are the kind of things that are always left out of other photo books but are essential to doing the job right. Thank you for being so generous. "
The book is backed up by a 300+ page website and even explains how to get started on the road to becoming a full time professional photographer.
For more information, visit:
http://www.all-things-photography.com/advanced-photography-books-for-beginners-and-amateur-photographers.html
Nick has a career and passion for photography spanning two and a half decades. He was recently voted "International Commercial Photographer of the Year 2005" by the S.W.P.P and B.P.P.A (Society of Wedding and Portrait Photographers and British Professional Photographers Association).
###
Also don't miss this one-
Stock Photography: Going Digital
How you can sell your digital stock images online today.
Getting up Close in Nature Photography
By Phil McDermott
Without doubt there is something awe inspiring and wholesome in the big view. Every year there are vast arrays of calendars all full of pretty landscape pictures adorning our high street shops. Many we can relate to and one day would like to see for ourselves. Indeed, we are fortunate in this country to be blessed with such wonderfully diverse scenery.
From the wide open spaces of the fens to the rugged mountains of Cumbria, Wales and Scotland. From rolling meadows to dramatic coastlines they all have an important part to play. However, sometimes with such a grand vista it is difficult to fully appreciate its beauty simply because there is nowhere for the eye to settle, no point on which to concentrate. There is just too much to take in. It is just so overwhelming.
However, if we can take a fresh approach and look hard for a moment at just part of this scene we begin to see and appreciate the finer features of the individual pieces of the landscape. Look at how they combine, fitting together like the pieces of a large jigsaw to make the complete picture. But let us now break it down into its basic components and take time to contemplate the colours, shapes and textures.
 We can then take this notion even further and that distant bright yellow patch becomes, on closer inspection, a rich and riotous stand of Broom. If we move closer still to the broom we see clearly the perfection and intricate detail in each flower and seedpod. Look even closer at the seedpod with its gossamer covering of fine hairs, each one an individual but reliant on its close neighbours and we can begin to understand how things fit together. Whilst this may not be a scientific approach it provides a raw and basic understanding, offers enlightenment and makes us feel an integral part of nature. So by isolating and concentrating on a small part of the whole we have simplified the subject. Made it more memorable, more basic and more powerful.
We have now entered the close up world of nature, a world that lies just beyond the familiar that is so full of rich detail and striking beauty. With an open mind, a little imagination and an almost childlike curiosity there are many more subjects for us to consider. There is certainly no need to go far. Indeed it should be seen as more of a soul searching journey, a journey of inner vision and contemplation rather than a journey to some far off place. Furthermore, the deeper we delve the more fascinating and rewarding they become. They reveal their hidden treasures without hesitation allowing us time to reflect and admire their majesty.
With this attention to detail it becomes easier to understand that the whole is clearly made up of many individual parts that are all unique. All these parts inter-relate with each other and no doubt they all have a vital role to play. Indeed, it is only by appreciating the importance of the smallest parts of our planet that I believe we can start to make any sense of nature as a whole. There is also emotion and drama to be found in these little cameos that we so often overlook, it may be something as simple as a single delicate flower growing in a boulder crevice. Hanging on and defiant, its tenuous grip on life is totally dependent on the sustenance that it draws from the debris residing in the crevice. Yet it lives on year after year, testimony indeed to its determination and resilience. It is this interrelationship that is so enduring, fundamental and compelling.
As a natural history photographer getting close to nature is a very important part of my life. It allows a far greater appreciation of the beauty and a clearer understanding of the natural world in which we live. Take for example a clear cold winters day with crispness so sharp it is breathtaking. When we start to look for details in these conditions we are immediately drawn to magical patterns in the snow, frosted ivy leaves and shimmering icicles. Ice patterns are one of my favourite winter subjects as they offer such diversity and literally capture a moment frozen in time. Some offer gracefully smooth curves whilst others display harsh jagged lines depending on the prevailing weather conditions. So even something as simple as a puddle icing over is heavily influenced by its immediate surroundings.
Light quality will also play a significant part in our appreciation of these finer details, if it is too harsh then the increase in contrast will actually block out the very detail we are trying to see. It is far better to have the diffused light that occurs with high thin cloud cover. This provides a much softer light allowing all the detail, texture and nuances to be so clearly seen. Subject colour will also influence our interpretation of the subject, for example vibrant colours like reds and yellows suggest dominance and power, whereas muted shades like grey and browns portray more tranquil, earthy and basic feelings.
Early morning is often a fine time to appreciate a wide range of subjects and a stroll in the garden will pay dividends. Flowers and grasses, for example when covered with dew or fine rain make fascinating studies, the fine hairs hold onto droplets of water so that they almost defy gravity. If the conditions are right there may be insects that have become encrusted with minute droplets of water following a night's inactivity. Butterflies in particular look stunning covered in dew as it makes them sparkle as though covered with a myriad of jewels.
So, with renewed vision and childlike wonder the natural world is without doubt a beautiful place that only requires a little time and an inquisitive mind to fully appreciate. Satisfaction and contentment can be provided by the simplest of things and with this comes harmony and hopefully inner peace.
Phil McDermott based on the Isle of Mull in the west of Scotland specialising in natural history and environmental photography.
“My priority is to uphold a genuine care and respect for the environment and subjects and the following pages unfold to reflect this approach. Through photography I hope to raise awareness and encourage a greater appreciation of the splendour of the natural world”.
Working almost exclusively in Scotland, with its magnificent scenery, diverse flora and fauna and remarkable quality of light all combining to provide a continual source of opportunity and inspiration.
Without doubt there is something awe inspiring and wholesome in the big view. Every year there are vast arrays of calendars all full of pretty landscape pictures adorning our high street shops. Many we can relate to and one day would like to see for ourselves. Indeed, we are fortunate in this country to be blessed with such wonderfully diverse scenery.
From the wide open spaces of the fens to the rugged mountains of Cumbria, Wales and Scotland. From rolling meadows to dramatic coastlines they all have an important part to play. However, sometimes with such a grand vista it is difficult to fully appreciate its beauty simply because there is nowhere for the eye to settle, no point on which to concentrate. There is just too much to take in. It is just so overwhelming.
However, if we can take a fresh approach and look hard for a moment at just part of this scene we begin to see and appreciate the finer features of the individual pieces of the landscape. Look at how they combine, fitting together like the pieces of a large jigsaw to make the complete picture. But let us now break it down into its basic components and take time to contemplate the colours, shapes and textures.
We have now entered the close up world of nature, a world that lies just beyond the familiar that is so full of rich detail and striking beauty. With an open mind, a little imagination and an almost childlike curiosity there are many more subjects for us to consider. There is certainly no need to go far. Indeed it should be seen as more of a soul searching journey, a journey of inner vision and contemplation rather than a journey to some far off place. Furthermore, the deeper we delve the more fascinating and rewarding they become. They reveal their hidden treasures without hesitation allowing us time to reflect and admire their majesty.
With this attention to detail it becomes easier to understand that the whole is clearly made up of many individual parts that are all unique. All these parts inter-relate with each other and no doubt they all have a vital role to play. Indeed, it is only by appreciating the importance of the smallest parts of our planet that I believe we can start to make any sense of nature as a whole. There is also emotion and drama to be found in these little cameos that we so often overlook, it may be something as simple as a single delicate flower growing in a boulder crevice. Hanging on and defiant, its tenuous grip on life is totally dependent on the sustenance that it draws from the debris residing in the crevice. Yet it lives on year after year, testimony indeed to its determination and resilience. It is this interrelationship that is so enduring, fundamental and compelling.
As a natural history photographer getting close to nature is a very important part of my life. It allows a far greater appreciation of the beauty and a clearer understanding of the natural world in which we live. Take for example a clear cold winters day with crispness so sharp it is breathtaking. When we start to look for details in these conditions we are immediately drawn to magical patterns in the snow, frosted ivy leaves and shimmering icicles. Ice patterns are one of my favourite winter subjects as they offer such diversity and literally capture a moment frozen in time. Some offer gracefully smooth curves whilst others display harsh jagged lines depending on the prevailing weather conditions. So even something as simple as a puddle icing over is heavily influenced by its immediate surroundings.
Light quality will also play a significant part in our appreciation of these finer details, if it is too harsh then the increase in contrast will actually block out the very detail we are trying to see. It is far better to have the diffused light that occurs with high thin cloud cover. This provides a much softer light allowing all the detail, texture and nuances to be so clearly seen. Subject colour will also influence our interpretation of the subject, for example vibrant colours like reds and yellows suggest dominance and power, whereas muted shades like grey and browns portray more tranquil, earthy and basic feelings.
Early morning is often a fine time to appreciate a wide range of subjects and a stroll in the garden will pay dividends. Flowers and grasses, for example when covered with dew or fine rain make fascinating studies, the fine hairs hold onto droplets of water so that they almost defy gravity. If the conditions are right there may be insects that have become encrusted with minute droplets of water following a night's inactivity. Butterflies in particular look stunning covered in dew as it makes them sparkle as though covered with a myriad of jewels.
So, with renewed vision and childlike wonder the natural world is without doubt a beautiful place that only requires a little time and an inquisitive mind to fully appreciate. Satisfaction and contentment can be provided by the simplest of things and with this comes harmony and hopefully inner peace.
Phil McDermott based on the Isle of Mull in the west of Scotland specialising in natural history and environmental photography.
“My priority is to uphold a genuine care and respect for the environment and subjects and the following pages unfold to reflect this approach. Through photography I hope to raise awareness and encourage a greater appreciation of the splendour of the natural world”.
Working almost exclusively in Scotland, with its magnificent scenery, diverse flora and fauna and remarkable quality of light all combining to provide a continual source of opportunity and inspiration.
12 essential facts, formulas, and photographic rules
Memorize This!
By Jason Schneider
12 essential facts, formulas, and photographic rules
What happens when your systems go belly-up, when all of that cutting-edge technology dies and you must rely on (gasp!) your own knowledge? It pays to have these basics in your head. They can get you out of a jam and help you get good shots when nothing else will.
1. Sunny 16 rule The basic exposure for an average scene taken on a bright, sunny day is f/16 at a shutter speed equivalent to one over the ISO setting—that is, f/16 at 1/100 sec at ISO 100. From this you can interpolate, and try f/22 at the beach, f/11 on a cloudy-bright day, etc.
2. Moony 11, 8, and 5.6 rules There are many different rules that work well when shooting the moon. One favorite for a proper exposure of a full moon is f/11 at one over the ISO setting. For pictures of a half moon, use the same shutter speed at f/8, and for a quarter moon, use the same shutter speed at f/5.6.
3. Camera shake rule The slowest shutter speed at which you can safely handhold a camera is one over the focal length of the lens in use. As shutter speeds get slower, camera shake is likely to result in an increasing loss of sharpness. So, if you're using a 50mm lens, shoot at 1/60 sec or faster. Not enough light? Use a flash, tripod, or brace your camera against a solid object.
4. Anatomical gray card Metering off an 18-percent neutral gray card is a good way to get a midtone reading that will give you a good overall exposure of a scene. Forgot your gray card? Hold your open hand up so it's facing the light, take a reading off your palm, open up one stop, and shoot. (Various skin tones rarely account for even a full-stop difference.)
5. Depth of field rules When focusing on a deep subject, focus on a point about a third of the way into the picture to maximize depth of field, because the depth-of-field zone behind that point is about twice as deep as the depth-of-field zone in front of it. This works for all apertures and focal lengths, but the smaller the aperture and the shorter the focal length, and the greater the distance you shoot at, the greater the depth of field.
6. Largest digital print rule To calculate in inches the largest photo-quality print you can make with a digital camera, divide the vertical and horizontal pixel counts (see your manual) by 200. For critical applications, or if you want exhibition-quality prints, divide the pixel counts by 250.
7. Exposure rules The classic advice is, "Expose for the highlights, and let the shadows take care of themselves." This works with slide film and digital. But with negative film, especially color negative, you're better off overexposing by one stop.
8. Quick flash-fill rule When using an automatic flash unit that doesn't provide auto flash-fill ratios, set the flash's ISO dial to twice the ISO you're using. Meter the scene, select an f-stop, set the autoflash aperture to the same f-stop, and shoot. The resulting 2:1 flash-fill ratio will produce filled shadows one stop darker than the main subject.
9. Flash range rule Want to know how much extra flash range you get by going to a faster ISO? The rule is, "Double the distance, four times the speed." For example: If your flash is good to 20 feet at ISO 100 (film or digital), it will be good to 40 feet at ISO 400.
10. Megapixel multiplier rule To double the resolution in a digital camera, you must increase the number of megapixels by a factor of four—not two. Why? The number of pixels in both the vertical and horizontal dimensions must be doubled to double the pixel density across the image sensor.
11. Action-stopping rules To stop action moving across the frame that's perpendicular to the lens axis, you need shutter speeds two stops faster than action moving toward or away from you. For action moving at a 45-degree angle to the lens axis, you can use a shutter speed one stop slower. For example: If a person running toward you at moderate speed can be stopped at 1/125 sec, you'll need a shutter speed of 1/500 sec to stop the subject moving across the frame, and a shutter speed of 1/250 sec to stop him if moving obliquely with respect to the camera.
12. Sunset rule To get a properly exposed sunset, meter the area directly above the sun (without including the sun). If you want the scene to look like it's a half-hour later, stop down by one f-stop, or set exposure compensation to minus one.

Photographing Kids
By A.Charlotte Riley
Kids grow up so quickly and while we are often left with countless memories, most parents have only a drawer packed with school photos, blurry holiday snaps and the forced grin of the inevitable yearly birthday picture to account for the years gone by. It's time to stop bemoaning the latest photograph of your thumb obscuring your adorable baby and get on with improving your skills as a photographer.
Why should you bother when the near-by mall has a perfectly good photo studio, you ask? Photographing children poses specific challenges but yields numerous rewards. While it can be frustrating when you miss that spontaneous moment, it is also highly satisfying when you manage to capture the joy in their faces as they dance in the summer's first sun shower. Capturing the day-to-day moments will provide a treasure trove of memories that you will cherish forever. As well, your own images take on a more personal feel and a more meaningful connection, something that can never be achieved in a generic mall photography studio.
Follow these easy steps and immediately improve your snaps of the kids.
Making The Unusual Usual
Friends with children often say to me-My child always pulls faces for the camera and I can't get a picture without little Johnny sticking his tongue out and crossing his eyes. Kids --and many adults as well-- are prone to hamming it up for the camera, however, they will be more natural if the camera is a part of their everyday life instead of brought out once or twice a year. By making it a regular part of their lives, it will increase the comfort level and encourage portraits that are more natural. Try bringing out the camera once or twice a week and focusing it on your kids. They will become accustomed to having it around and it will give you a chance to practice your technique, too. And, if they still clown around for the camera, get into the swing of things and enjoy it. Little monkey faces are a part of childhood!
Kids Eye View
As adults, we look one another in the eye and photograph our friends at eye level. Do the same for your children. Bend down on one knee or sit on the floor to get a picture that reflects a child's perspective. To add a little excitement, have fun playing with perspective by shooting the image from the ground up. Lie down on the ground and taking a picture from that viewpoint. Suddenly toddlers become giants and we can witness the world as they see it, by looking up.
Patience, Patience!
Small children have a limit of two or three minutes before they become bored with Mummy or Daddy's photo session. The urge to run off and play becomes just too much! Don't force kids to stay in one place for long, unless you like pictures of sullen little faces. If you are taking a formal portraiture-style photo be sure to plan ahead for the best possible results. Check your batteries, make sure there is film in the camera and if you are using a digital camera see that there is space on the memory card. Provide your toddler or small child with a prop, like a ball or a favorite toy to help create a more natural expression, instead of the one that says, Just hurry up and take my picture, Mom- Keep it fun and stress-free.
Fill The Frame
Because backgrounds can sometimes be distracting, do not be afraid to move in closer and take a picture of your angel's face. It creates drama and interest in the photograph and eliminates extra clutter. Unless you are taking a travel photo or an image of the child engaged in a particular activity, feel free to emphasize the most important element of the picture- your child. Use the zoom or macro tool on the camera to get in closer. Pictures of your little one's hands or feet can also be interesting studies, and one day you may find yourself saying, I can't believe they were so tiny!
Just A Little Off-Centre
Many professional photographers use The Rule Of Thirds approach which means that they mentally divide the frame into three sections both vertically and horizontally --like a tic-tac-toe grid-- and place the subject of the photo at one of these intersecting points. It helps to create a more dynamic photograph, than one where the subject is smack-dab in the middle. Take note that if your camera is an auto-focus model, you may have to focus first on your subject and then, with the shutter button still half-pressed, recompose the image.
Natural Light Rules!
One of the tricks of the trade in photography is to use morning or late afternoon light. The sunlight at this time is wonderful and helps to produce pictures that are bathed in warmth. Direct light flatters the subject and adds to a more intimate and natural-looking photograph. It also helps to greatly reduce the bane of every parent photographer- red eye!
Experiment with taking advantage of the sunlight pouring through a window, or march the kids outside on a sunny day and photograph them while they are playing tag. To have a well-lit photograph make sure the light is behind you, shining on the subject. To create drama, try using side light for impressive shading. If you try to take a photo with the sunlight behind your children, a technique known as backlighting, you will end up with the subject looking like a dark silhouette.
The Last Word
It really is all about fun. View the time you are taking to photograph your children as time to share in their adventures and imaginary play. A frustrated mom directing kids to a more picturesque location and insisting on a smile does not reflect kids' reality. Pick up the camera only when everyone is relaxed and happy. Finally, don't expect every photo to be a masterpiece. The truth is that only a few images from each roll are frame-worthy, but the important thing is to keep snapping away to capture the moments that depict their ever-changing lives, in all its unique glory!
Minggu, 14 Mei 2006
Infrared Photography with your Digicam
I found a nice article on the web about doing Infrared Photography with your digicam, and since I'm a big fan of IR photography, I thought I would feature it here. Many digicams on the market are capable of doing this kind of work. If your camera accepts add-on filters there's a good chance it is capable. I use a Sony F717 with a Hoya R72 filter to take shots like this one of my front yard.

At the first glance, a monochrome picture taken in infrared may look similar to just another black and white photograph. And then you start seeing differences: objects which are bright in visible light (like sky) look dark here, while some of those which are "normally" dark (green foliage) acquire a bright glow. An unusual and eerie feeling.
At the first glance, a monochrome picture taken in infrared may look similar to just another black and white photograph. And then you start seeing differences: objects which are bright in visible light (like sky) look dark here, while some of those which are "normally" dark (green foliage) acquire a bright glow. An unusual and eerie feeling.
A guide to digital photography DVD released
photo-i (in association with Canon) is producing a series of DVDs. The first (getting started) is aimed at the first time digital user. This DVD, which is optimised for TV viewing, contains a series of assignments shot on location exclusively for this DVD. It shows the viewer in a user-friendly way how to get the best results from their digital camera.
The pictures are manipulated in Adobe Photoshop Elements 4.0 (subsequent DVDs, available from 2006, will use Photoshop CS2). The manipulations are in the form of a fully animated screen movie, this enables the viewer to see the manipulations taking place in real time. Each assignment lasts for more than 12 minutes inclusive of the screen tutorial video and to-camera dialogue.
Easy Photoshop Video Tutorials

Running time: 2 hrs, 20 mins.
Language: English
Format : DVD video PAL – 4:3, optimised for TV viewing
Publisher: photo-i
ISB-10: 0-9552062-0-0
ISBN-13: 978-0-9552062-0-7
Price: GB£ 14.99
Availability: Via the web at www.photo-i.co.uk
The pictures are manipulated in Adobe Photoshop Elements 4.0 (subsequent DVDs, available from 2006, will use Photoshop CS2). The manipulations are in the form of a fully animated screen movie, this enables the viewer to see the manipulations taking place in real time. Each assignment lasts for more than 12 minutes inclusive of the screen tutorial video and to-camera dialogue.
Easy Photoshop Video Tutorials
Running time: 2 hrs, 20 mins.
Language: English
Format : DVD video PAL – 4:3, optimised for TV viewing
Publisher: photo-i
ISB-10: 0-9552062-0-0
ISBN-13: 978-0-9552062-0-7
Price: GB£ 14.99
Availability: Via the web at www.photo-i.co.uk
Ten Great Photoshop Tips You Might Not Know
Chris Tingom of Brainfuel has produced a handy compilation of 10 Photoshop techniques that will be new to a number of Adobe Photoshop users, beginning or advanced. Here's a sampler-
* Pressing the shift key constrains proportions when you resize objects. Simple yet obviously not everybody knows this one. If you don’t hold shift, it stretches. Honestly, I think Adobe products should automatically hold proportions.
* Use the Alignment Buttons. If you have multiple objects and you want to line them up you can easily do so by linking them together and using any one of the alignment buttons that appear when you have the move tool selected. This tip is great for lining up multiple text strings or shapes.
Easy Photoshop Video Tutorials
(more...)
Sabtu, 13 Mei 2006
Travel Photography Tips
Over at the new Digital Photography School Darren has been working on producing a series of tips for digital camera users who want to improve their Travel Photography.
A lot of these travel photography tips (and the ones that will follow) are aimed at travel photographers but will be appropriate for others who are staying at home also.
Have a look. Darren's been hard at work at his new site.
Jumat, 12 Mei 2006
How to take Motion Shots
Learn all about this great photography tip from the guys at Photodoto-
Read Capturing motion with panning
Photographs have always fascinated people with their ability to capture a fleeting moment, to freeze it and preserve it, in a very tangible way, forever. It’s an extremely powerful form of expression. But, through the use of creative exposures, a photograph can do much more than document the world and people around us. Photographs can record emotions, feelings, movement and pass those on to anyone who views them. One way of doing this is through the use of a technique called “panning.”"
Read Capturing motion with panning
Get the Guide to Digital Photography on DVD
Below is an unedited press release from photo-i.co.uk on their new DVD release on the techniques of taking pictures and manipulating those same pictures. Great if you don't like cumbersome books.
PRESS RELEASE: A guide to digital photography
www.photo-i.co.uk, the website dedicated to digital photography, has now set up a publishing division called photo-iDVD. Since it was launched just over four years ago, the site has had over 13 million unique visitors. Professional photographer and editor of the site, Vincent Oliver said, “With the explosive growth in digital camera sales, there is a huge demand for information and creative interest. But although the bookshelves are stocked with a good selection of written material, no one has embraced the full power of digital media by producing a multimedia package on the techniques of taking pictures and manipulating those same pictures. This would seem to be the most obvious and practical method for any one wishing to learn the digital imaging techniques.”
a guide to digital photography (in association with Canon) is the first DVD to be launched. Aimed at the beginner and casual user, it contains a series of exclusive assignments shot on location and shows the viewer in a user-friendly way how to get the best results from their digital camera. The pictures are manipulated in Adobe Photoshop Elements 4.0, a great introductory application for digital photography. The manipulations are in the form of a fully animated screen movie which enables the viewer to see the manipulations taking place in real time.
Written and presented by Vincent Oliver, author of the book The Advanced Guide to Digital Photography, this DVD is visual, practical and presented in a user-friendly way. The chapters and tutorials include:
- Essentials
The essential information and the gear you need to get you started
Tutorials: Opening and saving photos, selection tools, and clone tool - Portraiture
Using your gear to get a professional look
Tutorials: combining head shots, red eye removal, converting to b/w - Action
Getting instant response from your camera
Tutorial: adding motion to a still image - Architecture
From ancient to modern
Tutorials: correcting perspective, adding a new sky. - Landscapes
Understanding exposure on location
Tutorials: correcting slanting horizons, adding creative flare, colour correction - Panoramas
Taking a bigger picture
Tutorials: two tutorials on stitching images together - Interiors
Shot at Canterbury Cathedral. Custom white balance
Tutorial: combining multiple exposures to make a final picture - After Dark
Shooting when the sun’s gone down
Tutorials: colour balance, adding fireworks to a night shot.
Language: English
Format : DVD video all regions, PAL – 4:3, optimised for TV viewing
Publisher: photo-i
ISB-10: 0-9552062-0-0
ISBN-13: 978-0-9552062-0-7
Price: £14.99
Distributor: Computer Bookshops Ltd.,
205 Formans Road
Sparkhill
Birmingham
B11 3AX
Tel: 0121 7783333
“A guide to digital photography is an excellent learning resource.”
Amateur Photographer magazine
A second DVD. ‘scanning & restoration’ is underway and planned for a
summer 2006 launch.
Rabu, 10 Mei 2006
Point and shoot vs. a digital SLR
Digital Photography School has posted an article for those shopping for a digital camera. Darren Rowse dicusses the differences between Digital SLRs and Point and Shoot digital cameras. He says:
Read the full article...
"You want a portable camera that takes good pictures that you’ll mainly use for small prints and emailing that you’ll mainly shoot in auto mode - you’ll probably be quite happy with a cheaper point and shoot."
Read the full article...
Selasa, 09 Mei 2006
Canon 580EX and 550EX Speedlight Reference
For owners of Canon 580EX or 550EX Speedlights, Gordon McKinney has produced a custom function reference card for the 580EX and 550EX flashguns here.


Photoshop For Digital Photographers
Digital Photographers that use Photoshop take note- here is an online course just for you. As far as I'm concerned, Scott Kelby is a master of this craft. I have his books and refer to them constantly for my Photoshop tweaking of photos.
PRESS RELEASE: Kelby to Offer 21-Day Online Course 'Photoshop For Digital Photographers'
New 21-Day Online Training Class Offered Only at Photoshoptraining.com
PRESS RELEASE: Kelby to Offer 21-Day Online Course 'Photoshop For Digital Photographers'
New 21-Day Online Training Class Offered Only at Photoshoptraining.com
TAMPA, Fla. -- May 9, 2006 -- The National Association of Photoshop Professionals (NAPP), the world's leading educational and training resource for Adobe® Photoshop®, has just released Photoshop for Digital Photographers with Scott Kelby, a 21-day online training course on its newly launched training site - http://www.photoshoptraining.com. Featuring the #1 best-selling Photoshop book author and president of NAPP, Scott Kelby, Photoshop for Digital Photographers is an innovative online course for digital photographers to learn how to color correct, sharpen, fix and finish their digital photos at their own pace in the comfort of their home or work place. Learning Photoshop has never been this easy.
In just five minutes a day, Kelby takes online students through a special lesson showing them exactly how use a specific Photoshop feature from start to finish. Each lesson is designed to be quick, easy, and straight to the point, without a bunch of boring theory or confusing jargon. More online classes will be available from Scott Kelby in the coming months. Additionally, classes will be available from Dave Cross and Matt Kloskowski, Kelby's co-hosts of the popular Adobe Photoshop TV podcast (http://www.photoshoptv.com), Adobe Certified Experts, and NAPP instructors.
Pricing for the 21-day class is just $69.99. NAPP members receive a $30 discount paying just $39.99. To become a member of NAPP visit www.photoshopuser.com.
About Photoshoptraining.com
Launched by the National Association of Photoshop Professionals (NAPP), photoshoptraining.com showcases the most comprehensive Photoshop and digital imaging educational resources available today. It joins the creative line-up of educational resources and products produced by Scott Kelby and the creative team at NAPP, which publishes Photoshop User and Layers magazines, the Photoshop Elements Techniques newsletter; and produces the weekly Adobe Photoshop TV video podcast, the bi-annual Photoshop World Conference & Expo, the one-day Adobe Photoshop Seminar Tour, and a complete line-up of Photoshop books and DVDs. For more information about NAPP go to www.photoshopuser.com or its parent company website www.kwmediagroup.com.
Jumat, 05 Mei 2006
Backup, backup and backup
Just a friendly reminder - backup your photos often.
I had been very lazy about sorting and filing my pictures since last November. I had about 1000 images in a series of folders that were on my list to "sort" into my different picture folders (my two kids birthdays, christmas, and ski vacation were all in these folders - so some photos that meant a lot to me). I finally decided to spend a few hours sorting them out. Had an odd hiccup with the computer - every folder that did not have a unique name yet (still had the same folder name as when I took them out of the CF) disappeared on me. Not in the trash, nowhere. I was devestated - 1000 lost images. I started to go through all sorts of work to try and recover the lost images, but it was looking like it would be a nightmare (I have 50-60,000 photographs on the hard drive I use, so the recovery programs found tens of thousand of JPEG files and I had no way to know which ones to recover).
Took a deep breath and went to my office where I keep a second hard drive with my backups on it. Turns out I had backed up about two weeks before this potential tragidy (and those two weeks I had been away on business, so all those photos were on my laptop). I ended up losing nothing, but came so close to losing some precious memories.
Why did I share this? Because I remembered doing my backup right after reading a story like this where a person really did lose their photos.
So, backup, backup and backup again!
Weekend assignment: Introducing the weekend assignment
Looking to improve your photographic technique?
Perhaps you'd be interested in a Weekend assignment. That's what they are up to over at Photodoto, a new site on the scene.
Perhaps you'd be interested in a Weekend assignment. That's what they are up to over at Photodoto, a new site on the scene.
"The idea is simple: reading about technique is pointless without practice. My hope is that the weekend assignment will not only help you improve your photography but also give you some creative ideas to focus on each weekend to help you make fresh images."
Kamis, 04 Mei 2006
Apple Releases Aperture 1.1.1
According the The Imaging Resource, Apple Computer has released an update to Aperture, its professional image editing application. There has been much news circulating recently about the fate of the software project.
The 1.1.1 update "addresses several issues related to performance, stability, color correction, and display compatibility. Apple recommends the update for all Aperture users.
The update is also available from the Aperture download page on Apple's Web site. To install the update, you must first update to version 1.1 under Mac OS 10.4.6. The update addresses "performance, stability, color correction, and display compatibility."
Correcting Color Balance in Digital Photos
Color can be a tricky thing. While we rarely think about it, color is not absolute. Your eyes perceive color differently in the daytime and at night, for example. In low light, your eyes can't distinguish color and you tend to see mainly in shades of gray, usually without even realizing it. Likewise, the color of light affects the color of objects we see. Something that looks white in the midday sun might look yellowish indoors, under an incandescent light bulb.
And digital cameras are no different. Often we are surprised by the results of our digital photos when they seem to have a color cast to them. Often indoor photos have an orange cast for example. To determine whether or not you need to adjust the overall color, look primarily at two areas: people's faces and objects that should be white or gray. If the faces look good, you will probably be happy with the picture. If they don't, look at the white or gray areas to see if they have a color cast. Then use the software to remove that color from the overall picture.
Your picture-editing software program will have a menu option called Color, Color Balance, or Variations. You can correct the color cast of your picture by adjusting it according to the chart below:
| Color Cast | How to Correct |
| Too yellow | Reduce yellow or increase blue |
| Too blue | Reduce blue or increase yellow |
| Too green | Reduce green or increase magenta |
| Too magenta | Reduce magenta or increase green |
| Too red | Reduce red or increase cyan |
| Too cyan | Reduce cyan or increase red |
Rabu, 03 Mei 2006
Shooting Digital | Book Review
Good digital photography books are hard to find.
There are plenty of good, even great, books about the art and science of photography in general. The newer ones often contain some specific digital information, and a fair bit of the info in even decades-old books is still perfectly applicable to digital. F-stops, focal lengths, lighting, composition; all of that stuff works much the same for digital as it does for film.
When a photo book starts banging on about emulsions and fixatives and cross processing and slide versus print film and enlarging lenses and colour compensation and how to keep light out of a Holga, though... well, those pages are good places for a digital photographer to rest a coffee cup.
And if you're looking for information about the relative merits of JPG, RAW and TIFF image formats in an old photo book, you're going to be looking for rather a while.
Mikkel Aaland's Shooting Digital (subtitle: "Pro Tips for Taking Great Pictures with Your Digital Camera") doesn't pretend that film doesn't exist. It mentions silver halide technology when it's relevant, which'll help film photogs making the leap to digital to get up to speed. But like the title says, this is a book about digital photography, and it aims to give the most inexperienced digital happy-snapper information on how to get good results in all sorts of photographic situations.
It's got 269 content pages plus an index, and they're good-sized pages, too; the book's about 205 by 255mm. Every page contains either digital-relevant info, or example photos; Shooting Digital is lavishly illustrated. Nowhere is there information that's dead weight to a non-film photographer.
What you get
Shooting Digital opens with a primer on the differences between film and digital, resolution, lenses and focal length differences and what's up with that "35mm equivalent" stuff, the kind of digicam you'll need for different tasks, and the importance of knowing your particular camera's capabilities.
Throughout the book, the ordinary point-and-shoot consumer cameras that most people use get a lot of air time. Shooting Digital is not a publication for camera snobs or penis-free young professionals. The book even makes clear those times when a light, simple, flexible consumer camera will be a better photographic tool than a hefty pro-cam.
Chapter two is about shooting portraits, both candid and studio. How to stop your subject from looking like a serial killer, the Elephant Man or a Rembrandt shadow study, when and how you can use flash without ironing your subject's face flat, and why non-professional photographers might still want to bother setting up a mini-studio.
The most difficult portraits - kids, animals and people at parties - get their own whole chapter, which addresses picking the moment to shoot, dealing with shutter lag, and how to minimise the chance of disaster if it falls to you to photograph an Important Event ("Sorry, I missed that - could you take it again from 'I do'...?").
Next, it's action photography; more on how to pick the moment, how to minimise blur, and how to make worthwhile pictures even if you can't get rid of a lot of the blur.
Movie mode gets a whole chapter to itself. The slow seepage of camcorder capabilities into still cameras is one of the biggest new things about digital, but most "mini-movies" might as well not have been taken. Shooting Digital talks about how to make even very short movie clips say something, and how to use them to work around the artistic limitations of still photography in general. This chapter goes on to talk about mini-movie editing and distribution, with software suggestions for Windows and Mac.
Where Aaland talks about software, he tends to talk about the Mac more than Windows. Here it's particularly obvious, with more than two pages devoted to telling you how to add a fat black border to a low-res movie so it won't turn into LegoVision when played back on a Mac OS system which, apparently, plays everything full-screen.
Shooting Digital isn't a really Mac-centric book, though. Windows users don't have to plough through much more irrelevant info than this.
Next, there's a chapter on shooting on the road - kit bags, camera care and maintenance, storage and archiving, shooting strangers, dealing with adverse weather, and so on.
Next up, interiors and exteriors. The insides and outsides of buildings may have the decency to sit still, but that doesn't make them easy subjects. This chapter has lots to say about light, composition, exposure, and maximising image quality.
This flows naturally into the next chapter, on shooting landscapes. This chapter touches on the ineffable-word-of-God or idiotic-creativity-strangling (depending on your point of view) Rule of Thirds, but that's about as artsy-fartsy as Shooting Digital ever gets. I like the fact that Aaland talks about the technical aspects of beautiful pictures - How You Could Do This - and leaves the pictures to do the rest of the talking for themselves.
Next, there's a whole chapter about panoramas, including the fully or partially spherical "virtual reality" variety, and "object movies", where you can turn a virtual object around on screen rather than looking around a virtual landscape.
The next chapter's about "Shooting Your Stuff" - photographing objects for fun and profit. EBay sellers and hardware reviewers, ahoy; this is the bit where you learn how to make good looking product shots.
Next comes the out-there chapter - infrared, underwater and aerial photography, night shots, and the benefits of "digital grid" mosaics of low-res images. Then there's information on organising and sharing your digital photos - printing, storing, sorting, sending, showing - followed by some technical appendices about sensors and RAW data and image processing. And then there's the index.
Everything, and I do mean everything, has at least one photo to illustrate the principle being discussed, and Shooting Digital is also riddled with boxes talking about how software can help (in an old school photo book, these parts would be darkroom tips), what accessories may come in handy, and what's going on inside your digicam. The accessory and Know Your Camera boxes aren't necessarily specifically relevant to the chapter they appear in, but it's all good stuff.
Web support
Shooting Digital has a companion Web site, the inventively named Shooting-Digital.com. The site's not what you'd call a heavyweight at the moment, but it's got a bit of content and some perfectly good links, and promises to be better in the future.
Even if Mikkel Aaland gets eaten by a hippo tomorrow and the site freezes in its current state, though, there'll still be plenty of excellent photography sites on the Web.
Shooting Digital is worth the money without any extras. And, pleasingly, its price is not pumped up by a CD of questionable value inside the back cover.
Overall
Shooting Digital is both commendably up to date and likely to age well. It doesn't mention the very latest cameras and software, but it's not talking about particular cameras anyway, except to show the moments when some feature of a particular camera made it able to take some particular picture. In five years' time some of the technical info in Shooting Digital won't be relevant any more, but its basic points will stand - and there'll no doubt have been another edition or two by then, anyway.
Shooting Digital really is packed with useful advice, the value of much of which I can personally confirm. For instance, "Bracketing The Heck Out Of The Exposure" is indeed a valid technique, and yes, "prying flesh from frozen metal is painful".
Modern digital photography is, genuinely, a step up from film for most purposes, and it's only getting better. Sure, digital doesn't have the grass roots hackability of film, or the near-zero-dollar entry point, but just removing the image capacity and processing time limitations of film gives the photographer a much more direct involvement with the activity of image-making. Digital definitely does make learning easier.
And, importantly, consumer digicams now have good enough price/performance ratios that regular people really can do better with digital than they can with film - much better. Books about high quality digital photography are no longer like books about Lamborghini maintenance - this is mainstream now.
If all you ever do is take badly lit pictures of stunned-looking relatives with their noses in the dead centre of the frame, you're missing out on almost all of the value of any kind of photography. That's where this book comes in. Shooting Digital genuinely is full of "Pro Tips for Taking Great Pictures with Your Digital Camera"; it is the digital photography book that the vast bulk of digicam users have been waiting for.
Shooting Digital isn't likely to be very useful to someone who's already an accomplished photographer, even if they're moving into digital for the first time.
But if you don't look at your digital photos and think "Wow!" very often, it's high time you bought this book. Highly recommended.
There are plenty of good, even great, books about the art and science of photography in general. The newer ones often contain some specific digital information, and a fair bit of the info in even decades-old books is still perfectly applicable to digital. F-stops, focal lengths, lighting, composition; all of that stuff works much the same for digital as it does for film.
When a photo book starts banging on about emulsions and fixatives and cross processing and slide versus print film and enlarging lenses and colour compensation and how to keep light out of a Holga, though... well, those pages are good places for a digital photographer to rest a coffee cup.
And if you're looking for information about the relative merits of JPG, RAW and TIFF image formats in an old photo book, you're going to be looking for rather a while.

Mikkel Aaland's Shooting Digital (subtitle: "Pro Tips for Taking Great Pictures with Your Digital Camera") doesn't pretend that film doesn't exist. It mentions silver halide technology when it's relevant, which'll help film photogs making the leap to digital to get up to speed. But like the title says, this is a book about digital photography, and it aims to give the most inexperienced digital happy-snapper information on how to get good results in all sorts of photographic situations.
It's got 269 content pages plus an index, and they're good-sized pages, too; the book's about 205 by 255mm. Every page contains either digital-relevant info, or example photos; Shooting Digital is lavishly illustrated. Nowhere is there information that's dead weight to a non-film photographer.
What you get
Shooting Digital opens with a primer on the differences between film and digital, resolution, lenses and focal length differences and what's up with that "35mm equivalent" stuff, the kind of digicam you'll need for different tasks, and the importance of knowing your particular camera's capabilities.
Throughout the book, the ordinary point-and-shoot consumer cameras that most people use get a lot of air time. Shooting Digital is not a publication for camera snobs or penis-free young professionals. The book even makes clear those times when a light, simple, flexible consumer camera will be a better photographic tool than a hefty pro-cam.
Chapter two is about shooting portraits, both candid and studio. How to stop your subject from looking like a serial killer, the Elephant Man or a Rembrandt shadow study, when and how you can use flash without ironing your subject's face flat, and why non-professional photographers might still want to bother setting up a mini-studio.
The most difficult portraits - kids, animals and people at parties - get their own whole chapter, which addresses picking the moment to shoot, dealing with shutter lag, and how to minimise the chance of disaster if it falls to you to photograph an Important Event ("Sorry, I missed that - could you take it again from 'I do'...?").
Next, it's action photography; more on how to pick the moment, how to minimise blur, and how to make worthwhile pictures even if you can't get rid of a lot of the blur.
Movie mode gets a whole chapter to itself. The slow seepage of camcorder capabilities into still cameras is one of the biggest new things about digital, but most "mini-movies" might as well not have been taken. Shooting Digital talks about how to make even very short movie clips say something, and how to use them to work around the artistic limitations of still photography in general. This chapter goes on to talk about mini-movie editing and distribution, with software suggestions for Windows and Mac.
Where Aaland talks about software, he tends to talk about the Mac more than Windows. Here it's particularly obvious, with more than two pages devoted to telling you how to add a fat black border to a low-res movie so it won't turn into LegoVision when played back on a Mac OS system which, apparently, plays everything full-screen.
Shooting Digital isn't a really Mac-centric book, though. Windows users don't have to plough through much more irrelevant info than this.
Next, there's a chapter on shooting on the road - kit bags, camera care and maintenance, storage and archiving, shooting strangers, dealing with adverse weather, and so on.
Next up, interiors and exteriors. The insides and outsides of buildings may have the decency to sit still, but that doesn't make them easy subjects. This chapter has lots to say about light, composition, exposure, and maximising image quality.
This flows naturally into the next chapter, on shooting landscapes. This chapter touches on the ineffable-word-of-God or idiotic-creativity-strangling (depending on your point of view) Rule of Thirds, but that's about as artsy-fartsy as Shooting Digital ever gets. I like the fact that Aaland talks about the technical aspects of beautiful pictures - How You Could Do This - and leaves the pictures to do the rest of the talking for themselves.
Next, there's a whole chapter about panoramas, including the fully or partially spherical "virtual reality" variety, and "object movies", where you can turn a virtual object around on screen rather than looking around a virtual landscape.
The next chapter's about "Shooting Your Stuff" - photographing objects for fun and profit. EBay sellers and hardware reviewers, ahoy; this is the bit where you learn how to make good looking product shots.
Next comes the out-there chapter - infrared, underwater and aerial photography, night shots, and the benefits of "digital grid" mosaics of low-res images. Then there's information on organising and sharing your digital photos - printing, storing, sorting, sending, showing - followed by some technical appendices about sensors and RAW data and image processing. And then there's the index.
Everything, and I do mean everything, has at least one photo to illustrate the principle being discussed, and Shooting Digital is also riddled with boxes talking about how software can help (in an old school photo book, these parts would be darkroom tips), what accessories may come in handy, and what's going on inside your digicam. The accessory and Know Your Camera boxes aren't necessarily specifically relevant to the chapter they appear in, but it's all good stuff.
Web support
Shooting Digital has a companion Web site, the inventively named Shooting-Digital.com. The site's not what you'd call a heavyweight at the moment, but it's got a bit of content and some perfectly good links, and promises to be better in the future.
Even if Mikkel Aaland gets eaten by a hippo tomorrow and the site freezes in its current state, though, there'll still be plenty of excellent photography sites on the Web.
Shooting Digital is worth the money without any extras. And, pleasingly, its price is not pumped up by a CD of questionable value inside the back cover.
Overall
Shooting Digital is both commendably up to date and likely to age well. It doesn't mention the very latest cameras and software, but it's not talking about particular cameras anyway, except to show the moments when some feature of a particular camera made it able to take some particular picture. In five years' time some of the technical info in Shooting Digital won't be relevant any more, but its basic points will stand - and there'll no doubt have been another edition or two by then, anyway.
Shooting Digital really is packed with useful advice, the value of much of which I can personally confirm. For instance, "Bracketing The Heck Out Of The Exposure" is indeed a valid technique, and yes, "prying flesh from frozen metal is painful".
Modern digital photography is, genuinely, a step up from film for most purposes, and it's only getting better. Sure, digital doesn't have the grass roots hackability of film, or the near-zero-dollar entry point, but just removing the image capacity and processing time limitations of film gives the photographer a much more direct involvement with the activity of image-making. Digital definitely does make learning easier.
And, importantly, consumer digicams now have good enough price/performance ratios that regular people really can do better with digital than they can with film - much better. Books about high quality digital photography are no longer like books about Lamborghini maintenance - this is mainstream now.
If all you ever do is take badly lit pictures of stunned-looking relatives with their noses in the dead centre of the frame, you're missing out on almost all of the value of any kind of photography. That's where this book comes in. Shooting Digital genuinely is full of "Pro Tips for Taking Great Pictures with Your Digital Camera"; it is the digital photography book that the vast bulk of digicam users have been waiting for.
Shooting Digital isn't likely to be very useful to someone who's already an accomplished photographer, even if they're moving into digital for the first time.
But if you don't look at your digital photos and think "Wow!" very often, it's high time you bought this book. Highly recommended.
Casio Announces the EXILIM ZOOM EX-Z5
The new EXILIM ZOOM EX-Z5 comes with 5 mega-pixel resolution, 3x optical zoom, and a 2.5-inch TFT color display to view the photos in comfort. The EX-Z5 includes a lithium-ion storage battery, USB docking station and a camera bag.
A large number of BEST SHOT motif programs, which can be easily activated via the BEST SHOT button, makes it easy to take photographs at selected moments. Beginners therefore also have the possibility of setting their digital camera specifically to outside motif conditions. The freely selectable Easy Mode prevents inadvertent adjustment of the technical settings and makes it easier than ever to take pictures. The DIRECT ON function rounds off the user-friendly operability of the EX-Z5.
The integrated Anti Shake DSP (Digital Signal Processor) electronically reduces the risk of camera shaking. The Auto Macro function, Quick Shutter function and multi auto focus also safeguard correct focusing. The innovative Revive Shot function complements the pallet of functions of the EX-Z5. Old and faded photos can be photographed directly out of the photo album and replenished by means of Color Restoration technology. Thanks to CASIO's own digital restoration including trapezium correction, photos shine resplendent in their new color gloss. The Rapid Flash function takes three pictures with flash in succession in only one second. Additional flash functions for beautiful photo results with little ambient light are the Flash Assist function and the 4-function flash with Red Eye Reduction and Soft Flash. The internal memory of the new EXILIM digital camera can be increased with commercially available SD-/MMC cards.
The EX-Z5 delivery package includes a lithium-ion storage battery (NP-20), USB cable, AV cable, extensive software on CD-ROM and a hand carrying-strap. USB docking station, camera bags, neck straps and other comprehensive accessories are available optionally in the latest EXILIM look.
The EXILIM ZOOM EX-Z5 is available from the end of May 2006.
PRESS SUMMARY
The new EXILIM EX-Z5 is the perfect companion for the summer. With its matt-brushed, black surface it is a well-designed eye-catcher in every situation. At the same time the easy-to-handle digital camera convinces due to its simple operability and innovative EXILIM technologies. Users appreciate the 5 mega-pixel resolution with 3x optical zoom for fantastic photo quality, as well as the 2.5-inch TFT color display to view the photo motifs in comfort.A large number of BEST SHOT motif programs, which can be easily activated via the BEST SHOT button, makes it easy to take photographs at selected moments. Beginners therefore also have the possibility of setting their digital camera specifically to outside motif conditions. The freely selectable Easy Mode prevents inadvertent adjustment of the technical settings and makes it easier than ever to take pictures. The DIRECT ON function rounds off the user-friendly operability of the EX-Z5.
The integrated Anti Shake DSP (Digital Signal Processor) electronically reduces the risk of camera shaking. The Auto Macro function, Quick Shutter function and multi auto focus also safeguard correct focusing. The innovative Revive Shot function complements the pallet of functions of the EX-Z5. Old and faded photos can be photographed directly out of the photo album and replenished by means of Color Restoration technology. Thanks to CASIO's own digital restoration including trapezium correction, photos shine resplendent in their new color gloss. The Rapid Flash function takes three pictures with flash in succession in only one second. Additional flash functions for beautiful photo results with little ambient light are the Flash Assist function and the 4-function flash with Red Eye Reduction and Soft Flash. The internal memory of the new EXILIM digital camera can be increased with commercially available SD-/MMC cards.
The EX-Z5 delivery package includes a lithium-ion storage battery (NP-20), USB cable, AV cable, extensive software on CD-ROM and a hand carrying-strap. USB docking station, camera bags, neck straps and other comprehensive accessories are available optionally in the latest EXILIM look.
The EXILIM ZOOM EX-Z5 is available from the end of May 2006.
Langganan:
Postingan (Atom)